 |
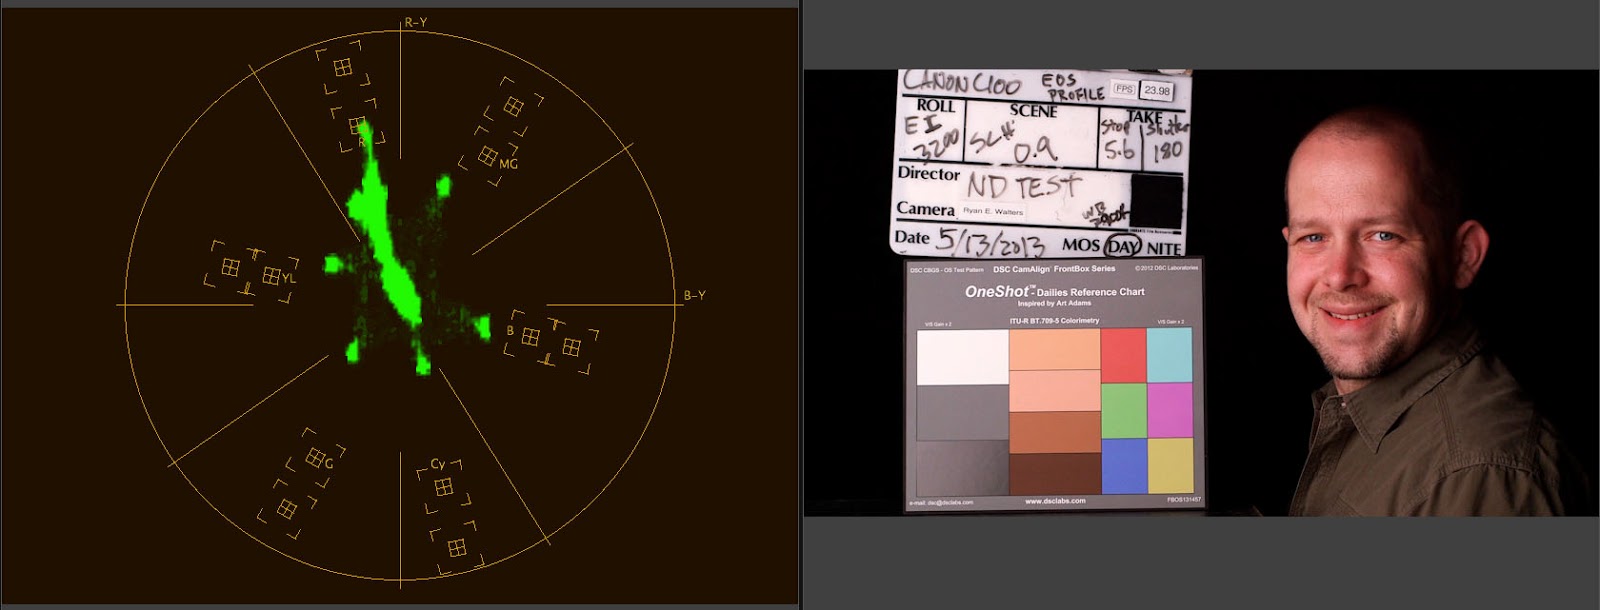
| The Control Frame for the ND Test |
Why Bother?
Before we dig into the results, you may be wondering why in the world I would even bother testing ND filters. That is simple: consistency. The more consistent and the more neutral the ND filters are, the more accurate the colors will be in addition to saving time and money on set and in post.
Imagine for a moment you are shooting an exterior scene on a partially cloudy day, where the light levels are constantly fluctuating 1-3 stops as the sun goes in and out of the clouds. You are constantly changing ND filtration to maintain your desired shooting stop. Unfortunately, the ND filters you are using are not neutral, nor are they consistently matched in their color balance. As you change filters from shot to shot, and even from take to take, the color balance of the image changes. And the resulting footage does not match.
You may think to yourself, "I'll just white balance every time I change filters." That is an option. However, that adds an extra step to the process, slowing you down, and it increases your shooting time. (Which is the most expensive time in the life of a production). Furthermore, the director and actors may be in their groove, and white balancing for every take can ruin the rhythm of their performances. This results in an unhappy director, and in unhappy actors.
But, then you think, "I'm shooting RAW, it doesn't matter. I'll fix it in post." Also an option. However, I see two problems with that line of reasoning. First, a sloppy discipline on set yields for lower quality work. I care about the quality of the work that I do. And those whose work I admire most care a great deal about their work too. They go to great lengths to ensure quality results, and so should I. Perpetuating sloppy work habits are not the way to hone my craft. This is regardless of whether I am shooting RAW or not.
(You might also like: Why You Should Be Using ND Filters For Interior Work)
Second, it needlessly adds to the cost and workload of the post team. They may or may not have the time and budget to fix the discrepancy. In an ideal world, when it comes time to grade the final edit, the colorist (which may be myself on a smaller production) can create a look and apply it to the shots that match that setup. If part of a close up was used from one take, and another part from a different take and they have a different color balance to them, they have to be corrected separately. Is that really where you want to be spending your time and money? Personally, I think it is more important to spend it on the creative portion of filmmaking and storytelling, not on the fixing of problems that could have been prevented through proper expertise and discipline...
My Assumptions & Biases
If you have seen the previous tests that I have done with IRND filters (or this test), you probably already know that Schneider is my brand of choice when it comes to filtration. I have had good success over the years using their filters. And it is from this history that I have developed a natural bias towards them. So I think it is only fair to acknowledge that, and to do my best to still judge this test impartially.
I will also be testing the internal ND filters of the Canon C100. Because the filters are provided with the camera, it is my assumption that they will perform the best in this test. My assumption is based off of Canon's ability to do its own specific R&D in the design of its sensor, internal processing of the sensor and in the design of ND filter. Having that much control over the process should allow Canon to have the edge in this test.
What To Look For
 |
| Points of interest to be paying attention to in this test. |
The green marks you see in the image above are called the trace. The trace represents colors and saturation. As a color is more saturated, the trace will move further out towards its vector (the boxes). Black and white are represented in the center of the scope as they are unsaturated. As the trace moves around and shifts within the scope, it is displaying the color balance of the image. The noise in the image is also displayed in the thickness of the trace. As you see the results in this test, and compare them to the control frame, you'll notice the trace gets thicker as the EI (Exposure Index) is increased. That is the result of noise in the image.

While it is important to pay attention to all of the traces in this image, there are three points that are the easiest to see the change in. The first point is the red trace (Upper Left). Watch how far out it extends towards the red vector. The second thing to pay attention to is the main body of the trace (Center). Pay attention to how it rotates and shifts toward different vectors. And finally, with the blue trace, watch how far it extends towards the blue vector (Lower Right).
The Setup

This test was shot on the Canon C100 using the default EOS profile. Although the EOS profile does not allow for the full use of the sensor's dynamic range, I chose it for two reasons. First, Canon has gone to great efforts to make skin tones look nice on this profile. And as that is the most immediately recognizable color for just about everyone, it is the color I care about most. Second, by using a baked in profile like EOS, I am able to export out still frames for immediate evaluation without introducing any potential "contamination" or bias introduced through a grade.
I also chose to go with a Canon camera for this test, as I have found that they are relatively impervious to IR contamination, as Canon has gone to great lengths to resolve this at the camera level. As demonstrated by this test done by Abel Cine. (The C100 has the same sensor in it as the C500 does).
This setup was lit with 2x 401 Diva's with daylight tubes through two layers of 4' x 4' Full Grid. (These lights also lessen the possibility of IR contamination). I then white balanced the camera to the back of the One Shot Chart and left the white balance as is. I chose to adjust the EI to compensate for exposure levels in order to avoid any potential artifacts by changing the aperture of the lens. The lens I used was a Sigma 28mm-70mm F2.8, and it stayed locked at F5.6. For the last exposure using the 1.8 ND I also changed the shutter speed to 360 degrees to gain that extra stop I needed. Fortunately, this isn't a motion test, and these are still frames, so motion blur does not play a factor here.
The Results (Finally ...)
DOWNLOADABLE TIFFS (79MB)
Here is the control frame- how the colors appear without any ND filtration:
 |
| The Control Frame - No ND Filtration |
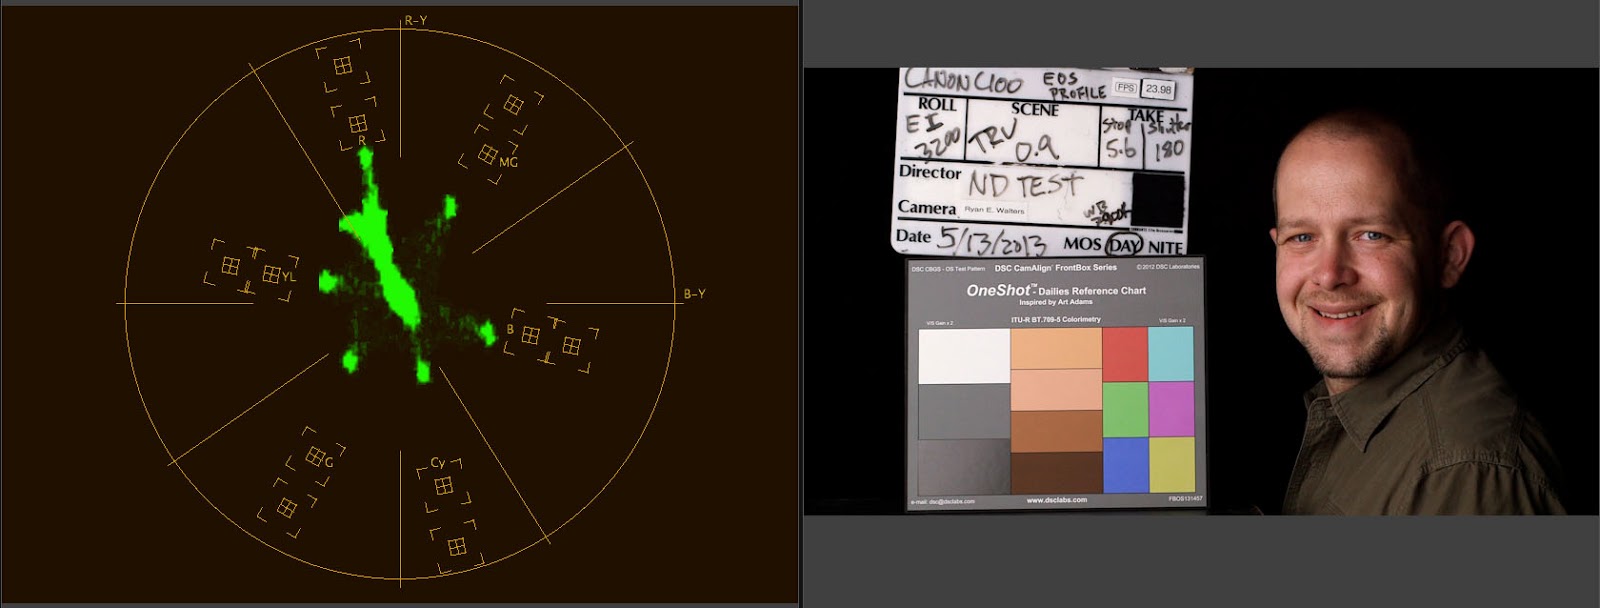
The Formatt Filters
(Around $220 each for the 4 x 5.65)
Supplied thanks to Shawn Nelson. (Unfortunately the 0.3 ND was temporarily out of commission).
 |
| Formatt 0.6ND |
 |
| Formatt 0.9 ND |
 |
| Formatt 1.2 ND |
 |
| Formatt 1.5 ND |
 |
| Formatt 1.8 ND |
The Schneider Filters
(Around $230 each for the 4 x 5.65)
These are the filters that I have a bias toward, so I'm wanting them to perform well...
 |
| Schneider 0.3 ND |
 |
| Schneider 0.6 ND |
 |
| Schneider 0.9 ND |
 |
| Schneider 1.2 ND |
 |
| Schneider 1.5 ND |
 |
| Schneider 1.8 ND |
The TrueND Filters
(Around $500 each for the 4 x 5.65)
Developed by Mitomo in Japan this set of high end filters promises true neutrality, and currently only goes up to a strength of 1.5. These filters are also built to block IR down to 750 nm, which is helpful as long as your camera system doesn't need IR filtration below that level.
 |
| TruND 0.3 ND |
 |
| TruND 0.6 ND |
 |
| TruND 0.9 ND |
 |
| TruND 1.2 ND |
 |
| TruND 1.5 ND |
The Internal ND Filters
In the C100 there are only three options 0.6, 1.2, and 1.8. So this one will be short and sweet...
 |
| Internal ND 0.6ND |
 |
| Internal ND 1.2 ND |
 |
| Internal ND 1.8 ND |
SUMMARY JUDGEMENT
I am surprised by these results, as I had expected the internal ND filters to perform the best, but it appears that even Canon has difficulty making ND filters for their camera. Here is how I see these filters stacking up:
1. TruND
The TruND filters come out on top as being the most neutral of the filters that I tested. Although I can't say that they are 100% neutral, they are the closest thing to neutral that I have seen. I'd say they are 98% neutral, which is quite impressive, especially at densities of 1.2 and 1.5. I hope they will add to their offering with 1.8 and 2.1 densities. (Although for the time being I'll just stack the filters as needed).
2. Internal ND
The Internal ND filters of the C100 are remarkably good. However, their slight shift towards magenta and red is greater than the TruND's. This is why I had to place them lower than the TruNDs. While I am grateful to have the internal ND's for when I want an ultra small camera package, I do find it frustrating to only have three options, as the strength I need will inevitably be the one that is not built in.
3. Formatt
The Formatt filters all shift towards red. Although the strength of that shift does jump around inconsistently, at least it is a shift in the same direction. The 1.2 and the 1.8 are the worst offenders of the bunch.
4. Schneider
Even though Schneider is my favorite filter manufacturer, I had to place them at the bottom of this test due to the inconsistency of the color balance throughout the range of filters. Jumping around from red to blue is a drastic change, especially at 0.6 & 1.8. And these are the kind of shifts I want to stay away from.
Again, the results were surprising to me. This is one reason why these tests are key. I value walking onto set armed and ready with the best tool for that particular job.
What ND filters are you using? Have you tested out their color consistency? Do you have any recommendations that you would like to add?
Until Next Time - Get Out There And Shoot!
Ryan E. Walters, Cinematographer
RELATED POSTS
Why You Should Be Using ND Filters For Interior Work
The Power Of Camera Filtration
Filter Comparison
RELATED POSTS
Why You Should Be Using ND Filters For Interior Work
The Power Of Camera Filtration
Filter Comparison
No comments:
Post a Comment