
When I first began shooting corporate videos, it was standard practice to have the talent deliver to the interviewer off screen. And this is still the standard practice today. However, with the increasing volume of YouTube videos out there (where people are delivering straight to camera), it is becoming more and more the norm to deliver straight to camera.
All of this is great and easy to do if you are shooting with one
camera. But what do you do if you have to shoot a talking head that delivers
straight to camera and you need it in two shot sizes? Well, I recently spent
the day experimenting with setups and came up with a solution that is easy and
affordable to implement.
Why Not Shoot Off Axis?
The traditional approach to a two camera setup for an interview
or talking head is to place the second camera off to one side of the main
camera. Unfortunately, when someone is delivering straight to camera, it
precludes the second camera from being placed to either side. Why? Because the
further off axis from the main camera that the second camera gets, the more
removed, and less personal, that shot becomes. And the whole point of
delivering to camera is to connect with the viewer, as if you are having a one-on-one
conversation.
Even with today’s small cameras, I've found that
placing them side-by-side still results in a close up or medium shot that feels
off. So I had to figure out another approach...
 |
| Notice how the subject/background relationship, facial features, and lens height all remain the same ... |
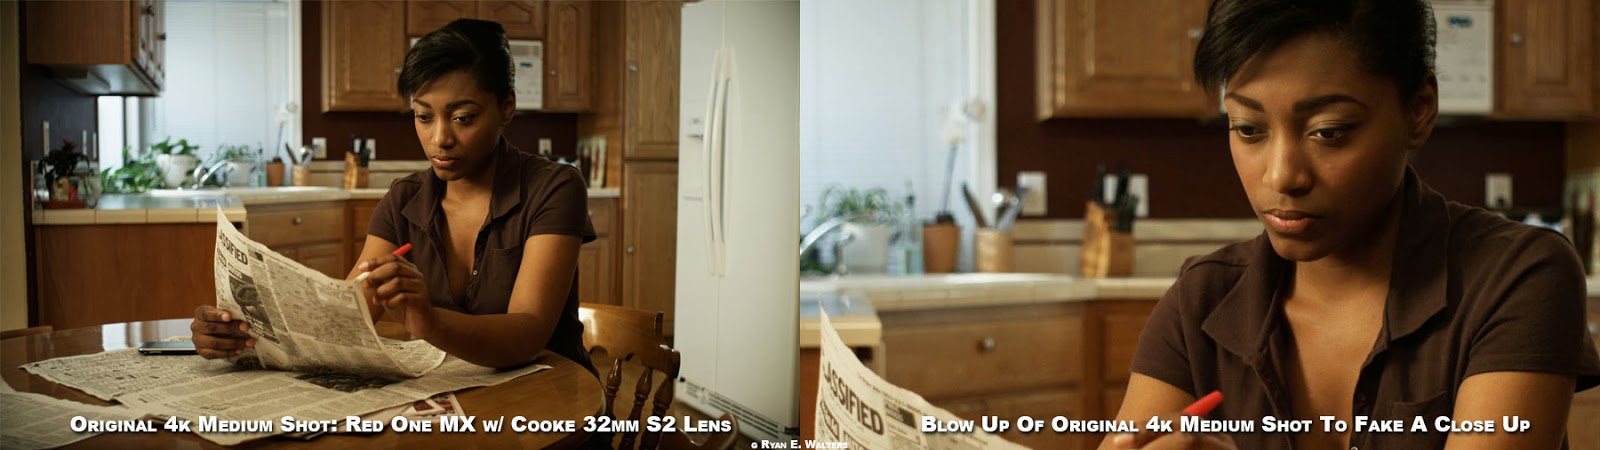
Why Not Shoot 4k or 5k & Zoom In?
Bleck! I hate that approach! While it technically works when you
are delivering in 1080p, it does not deliver the same results. Whatever lens
you used for the wide or medium shot retains its properties when you zoom in on the
footage. The camera also remains at whatever lens height the original shot was taken at. And that original wide lens, and lens height may not be so flattering on your talent. If you
are trying to make someone look their best, accentuating their nose, eyes, and
ears with a wide lens is not the way to do it. It is impossible to get the same
look that a longer lens, and higher lens height will give you by just zooming in the footage ...
My Approach:
Using my "studio" to set up a test scenario, I grabbed
my C100 and a 60D to experiment and came up with this solution (But I think the idea / principle can be applied to many cameras.):
 |
| C100 On Top & 60D On Bottom |
- C100 On Bottom:
I used the camera that recorded to the better codec as my main
wide/medium shot camera. I went this route because the better codec (Ninja 2:ProResHQ in this case) would hold up better at capturing fine detail. And since
this camera had the wider lens on it, that was the way to go.
While the C100 cage does have a number of screw holes in it,
unfortunately none of them were at the right position to mount my Noga arm. So
I had to improvise. By screwing a cheese plate to the cage, I could raise the
connection point to the height I needed.
(You might also like: Three Reasons Why Fixing It In Post Will Ruin Your Career)
Now with a hole at the right height, I attached a Noga Arm to the
Cheese Plate and a hot shoe adapter to the other end. The Hot Shoe adapter then
allowed me to connect the 60D on top.
 |
| Cheese Plate Screwed Into Cage |
 |
| Noga Arm Into Cheese Plate |
 |
| Hot Shoe Adapter Attached To 60D |
- 60D On Top:
The 60D is just a DSLR that records to H.264. Nothing fancy.
Since it is a lower grade codec, and it doesn't hold up well with fine detail,
I chose to use it for the close up. Making this choice allows me to hide many
of the shortcomings of the H.264 compression, and play to its strengths. So I
put the longer lens on this camera, and hung it just above the C100.
And what made this placement really advantageous is that a close
up usually means that the camera has to be placed higher in relation to the
wide shot. With the 60D sitting just on top of the C100, I found it felt like
it was at the right height.
 |
| Notice how my facial features are rendered more pleasantly with the 50mm lens ... |
The Importance Of Eye-lines
Now this is the tricky part, and it is where I could have used an
assistant. Trying to test this out by myself was rather challenging. I still
haven't perfected the art of being in two places at the same time... ;).
Anyway, from my crude tests, I found that if I looked at the bottom of the 60D
lens it looked like I was still looking at the Close Up and the Medium Shot at
the same time. (Is it perfect? Nope- but it is good enough for a proof of concept test.)
If I looked at the center of the 60D lens, I could tell that I was
not looking at the camera in the wide shot. If I looked at the C100, I could
REALLY tell that I was not looking at the 60D.
Finding the correct eye-line can be tricky- so you'll want to
allow for some time and practice before you start recording the talent. It will
also help you if you can monitor both cameras on a large screen, as it will
make it easier to tell where the talent is looking. Oh, and one last suggestion
about eye-line- it may also help if you use bright red tape, or some other
marking to show the talent where to look, as it will most likely not be
directly into either camera- and for a "direct" to camera delivery,
that can feel weird.

---SIDE NOTE: Matching Cameras?
So how hard is it to match the C100 & 60D? Not that hard
actually. What I love about Canon is that they have gone to great efforts to
make sure their built-in profiles in the C100 match their other cameras. So
when I switch the C100 into the EOS profile, and I set the 60D to Standard, I
know I get images that intercut almost seamlessly. (The 60D is a bit more magenta, so that has to be removed in post to get an exact match. The example above still has the magenta cast in it.)
However, by using the Standard profile on the 60D, and the EOS
profile on the C100, you do lose dynamic range (especially on the C100- not so
much on the 60D). But in a studio situation like this, where I get to control
the lighting, it works fine. If your goal is to simplify post, and have camera
match out of the box, using the EOS & Standard profiles is the way to go.
If you are wanting to get the most out of both cameras, then use
the ProLost settings on the 60D and C-Log on the C100, and make sure to shoot a color reference chart (One Shot) so that you can grade the footage to match later on.
---
Now all you have to do is to make sure to press record on both
cameras! Simple as that- an efficient setup that allows you to get your two
shots while playing to each camera's strengths. :)
Have you encountered this situation before? If so, how have you
solved it? What recommendations can you make?
Until Next Time - Get Out There And Shoot!
Until Next Time - Get Out There And Shoot!
Ryan E. Walters, Cinematographer
No comments:
Post a Comment